1.初体验(REPL)
- R(read) 读取(读取用户输入的代码)
- E(exec) 执行 (执行用户输入的代码)
- P(print) 打印(打印用户输入的js代码)
- L(loop) 循环 (后续所有js代码执行都会循环以上命令)
- 退出:ctrl+c
1.1通过命令行运行js代码
- 命令行输入node启动node后直接输入js代码
- 命令行node xx.js运行js文件
(cls清屏)2.模块系统
js三大组成部分: - ecmascript(声明js变量,判断,循环等语法)
- dom(document)
- BOM(window,local等)
模块(http服务器等)2.1简介
2.1.1使用Nodejs编写应用程序主要使用
- ecmascript语法:变量、判断、循环等(js三大组成部分:ECMA/DOM/BOM)
- 内置核心模块:http服务、fs文件操作、url路径、path路径处理、os操作系统
- 第三方模块:
- 自定义模块:自己创建的js文件
2.2.2CommonJS模块模范
- 一个文件就是一个模块
- 通过require来加载模块
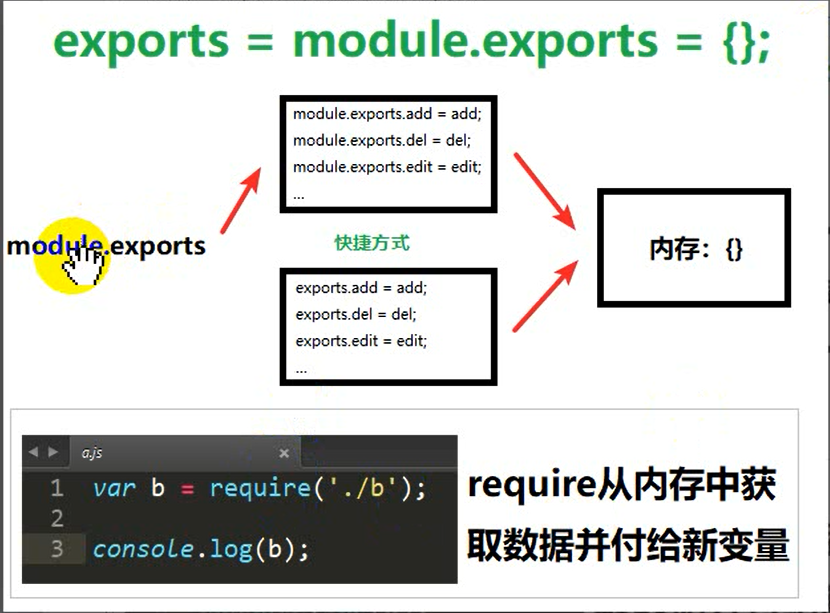
- 通过exports和modul.exports来到导出模块中的成员(声明模块中哪些功能可以使用)
2.2自定义Node.js模块
2.2.1语法
1
2
3
4
5
6
7
8
9
步骤1:导出成员(声明模块中/文件中哪些方法可以被外部使用)
//写法1
exports.属性/方法名=功能
//写法2
module.exports.属性/方法名=变量名
步骤2:外部引入使用
//使用:先引入再调用
var 对象=require('路径及文件名')
对象.属性或方法名
2.3第三方模块
2.4Node.js内置模块
2.4.1获取操作系统信息(os模块) –了解
1 | // 字节是计算机中的一种计量单位,表示数据量的多少 |
2.4.2路径处理(path模块)
1 | //dirname 去最后一个 |
2.4.3网址处理(url模块)
1 | //1.创建url对象(引入nodejs内置url模块) |
2.4.4文件处理(fs模块)
2.4.4.1写入文件
语法:
1 | //1.创建fs对象(引入node内置的fs模块) |
练习:
1 | //1.创建fs对象(引入node内置的fs模块) |
2.4.4.2读取文件
1 | fs.readFile('../../data/data01.txt', 'utf-8', function(err,data) { //不加解码类型会是buffer对象 |
2.4.5引入http服务器并创建服务器
- 创建http服务器
1
2
3
4
5
6
7
8
9
10
11
12
13
14
15
16
17
18//说明
//nodejs作用:1-提供JS运行环境,2-提供N多模块(API)让JS更强大
//1.创建http对象(引入node内置的http模块)
var http = require('http');
//2.创建http服务器(调用http对象的createServer)
var server = http.createServer();
//3.监听用户请求
server.on('request', function() {
console.log('收到客户端请求了');
});
//4.启动服务器
server.listen(8080, function(){
console.log('服务已启动,可以通过:http://localhost:8080 访问测试')
}); - 响应数据
1
2
3
4
5
6
7
8
9
10
11
12
13
14
15
16
17
18
19
20
21
22//1.创建http对象(引入node内置的http模块)
var http = require('http');
//2.创建http服务器(调用http对象的createServer)
var server = http.createServer();
//3.监听用户请求(形参:request-请求对象,response-响应对象)
server.on('request', function(request, response) {
//有请求DOS窗口就输出
console.log('收到客户端请求了,请求路径是:' + request.url);
//响应请求
//write方法:声明给客户端发送的数据
//end方法: 结束响应
response.write('hello,');
response.write('itcast');
response.end();
});
//4.启动服务器
server.listen(8080, function(){
console.log('服务已启动,可以通过:http://localhost:8080 访问测试')
}); - 响应不同数据
1
2
3
4
5
6
7
8
9
10
11
12
13
14
15
16
17
18
19
20
21
22
23
24
25
26
27
28//1.创建http对象(引入node内置的http模块)
var http = require('http');
//2.创建http服务器(调用http对象的createServer)
var server = http.createServer();
//3.监听用户请求(形参:request-请求对象,response-响应对象)
server.on('request', function(request, response) {
//获取请求路径(注:默认请求站点根目录)
var url = request.url;
//判断请求路径
if (url == '/') {
var content = 'this is index';
} else if (url == '/login') {
var content = 'this is login';
} else {
var content = '404 Not Found';
}
//响应请求
response.write(content);
response.end();
});
//4.启动服务器
server.listen(8080, function(){
console.log('服务已启动,可以通过:http://localhost:8080 访问测试')
}); - 解决中文乱码
1
2
3
4
5
6
7
8
9
10
11
12
13
14
15
16
17
18
19
20
21
22
23//说明
//nodejs作用:1-提供JS运行环境,2-提供N多模块(API)让JS更强大
//1.创建http对象(引入node内置的http模块)
var http = require('http');
//2.创建http服务器(调用http对象的createServer)
var server = http.createServer();
//3.监听用户请求(形参:request-请求对象,response-响应对象)
server.on('request', function(request, response) {
//响应请求
response.setHeader('Content-Type', 'text/html; charset=utf-8');
response.write("哥哥来抓我呀,<a href='http://nn.com'>点击进入我的世界</a>");
response.end();
});
//4.启动服务器
server.listen(8080, function(){
console.log('服务已启动,可以通过:http://localhost:8080 访问测试')
});2.4.6请求和响应对象
- 请求对象
1
2
3
4
5req.headers 获取请求头信息(对象)
req.rawHeaders 获取请求头信息(数组)
req.httpVersion 获取HTTP版本
req.method 获取请求方法
req.url 获取请求路径(注:不含网址) - 响应对象(响应应查看mime类型)
1
2
3
4
5
6
7
8
9
10
11res.statusCode = 404;
res.statusMessage = 'Not Found';
res.setHeader('Content-Type', 'text/html; charset=utf-8')
//简化版
res.writeHeader(404, 'Not Found', {
'Content-Type' : 'text/html; charset=utf8'
})
res.write(数据)
res.end()es6新特性
- es6标签替换
1
2
3
4
5
6var html1=``;
msgs.forEach(function (items) {
html1+=`<li class="list-group-item">${items.name}:${items.content} <span class="pull-right">${items.create_at}</span></li>`
})
lg.innerHTML=html1 - 传统标签替换
1
2
3
4
5
6
7
8var eleLi="";
for (var i=0;i<msgs.length;i++){
eleLi+="<li class='list-group-item'>"+msgs[i].name+'说:'+msgs[i].content+" <span class='pull-right'>"+msgs[i].create_at+"</span></li>"
}
lg.innerHTML=eleLi
切换NodeJS版本
说明:通过nvm工具可以实现nodejs任意版本切换
命令
1
2
3
4
5
6
7
8
9
10
11nvm version
nvm install latest
nvm install 版本号
nvm uninstall 版本号
nvm list
nvm use 版本号安装nvm


- 通过nvm查看托管nodejs版本 -> 安装测试版 -> 切换测试版 -> 验证


- 切换稳定版 -> 验证

解决nvm下载慢的问题
命令行输入 where nvm
在提示目录下找到settings.txt
后面添加淘宝镜像:
1
2
node_mirror: https://npm.taobao.org/mirrors/node/
npm_mirror: https://npm.taobao.org/mirrors/npm/